Well this post is about Timothy's yearly tradition with his best friends to go to 7 11 every July 11th to get all the free slurpees they can. It started back when we would let them ride their bikes far enough from home to go to the 3 7 11's close to us. Now it has no limits, they drive everywhere. It is sad that this is their last year of doing this for a while since they are headed of to College and the Military I felt the need to scrap something to remember this by when I went out to Clean Tim's car out after he left and found the pile of cups he left behind from this tradition with his friends.
Thursday, July 28, 2011
Sunday, April 03, 2011
Sewing
I have always loved sewing, I learned how to way back when I was a kid. I remember sewing on my Mamaw's peddle sewing machine and loved it!! My Mother was always sewing as I was a kid, she made my clothes all the time, I have a different outfit for school the first couple of grades, I would fall asleep listening to the machine humming. I would sew doll and barbie clothes and did move up to sewing clothes for myself. I remember the first time I actually use a pattern for some clothes for myself and my Mother trying to show me how to follow it, it was a Linen Jacket I was making. It was right then and there I learned I was a very visual learner.
Well here is a sewing book I did for the Maya Road booth at CHA, and I did it for all the women in my life that taught me my crafts....I thank them very much.
Thank you and have a wonderful Day!!!!
Well here is a sewing book I did for the Maya Road booth at CHA, and I did it for all the women in my life that taught me my crafts....I thank them very much.
Thank you and have a wonderful Day!!!!
Thursday, February 17, 2011
Canvas Wristlet....
Here's a great gift idea. You can give it just decorated or even use an ATC coaster album in it for a great gift. I used Maya Mist to watercolor mine and added trim and dangles. It was so easy and quick and I think it turned out great. First I wet the whole thing with a spray bottle then I used a mask to get the detail, any mask you like will do. I then used my watercolor brush and dipped it into mist and brushed the color where I wanted it, if I wanted the color to look more washed out I added more water, or you can add more color.
Monday, February 07, 2011
Home Tweet Home
WOW!!! I am really going to work on posting more often, I promise. Let's see I am going to shoot for at least once a week.
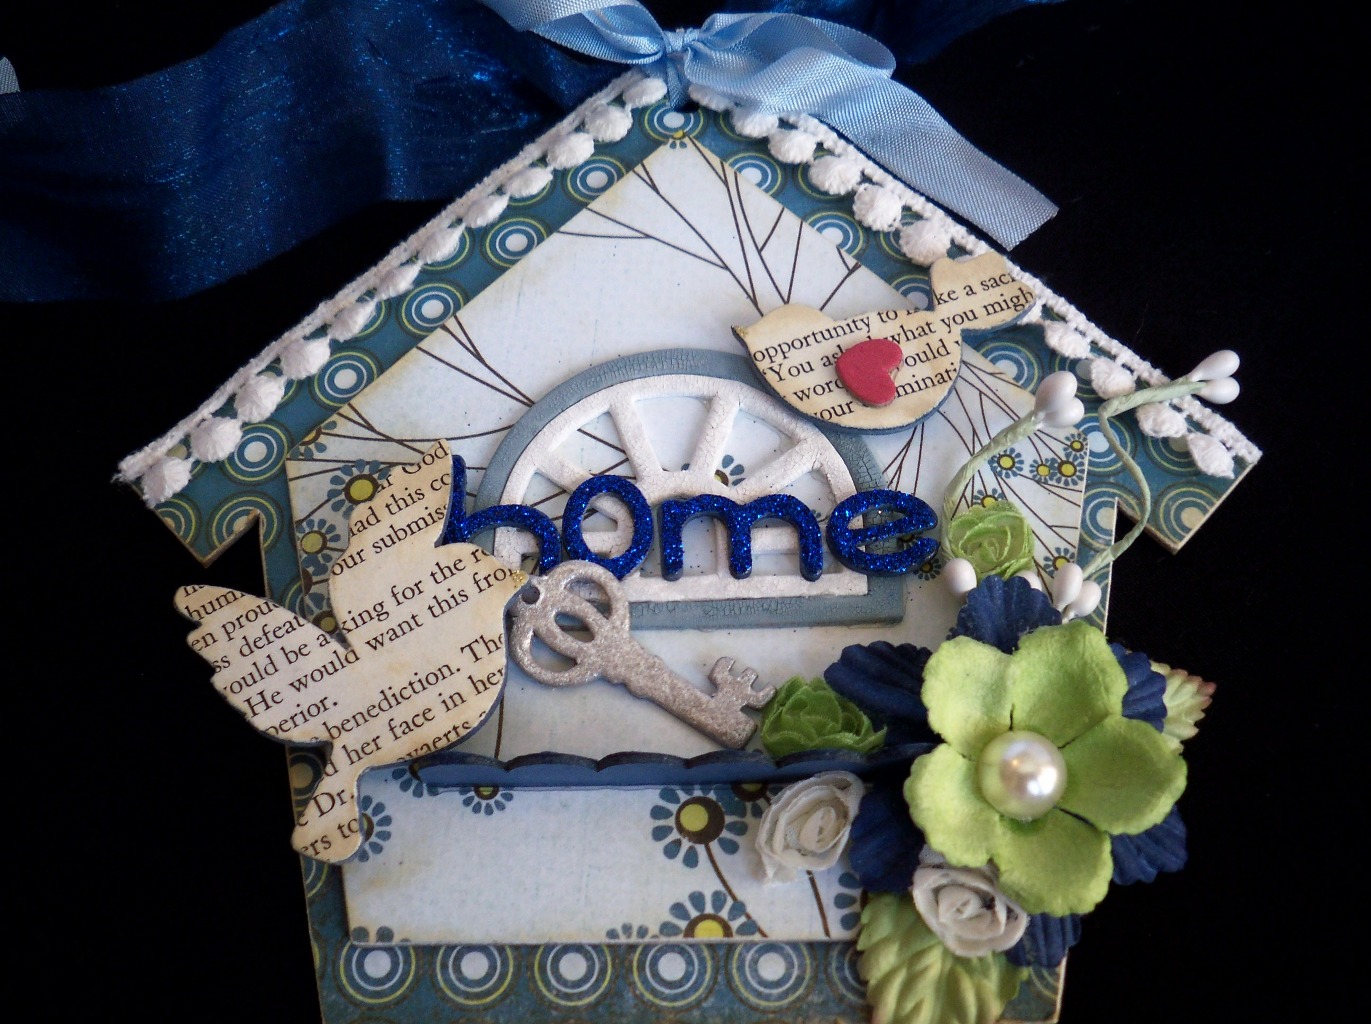
Here is a project I did for CHA and the Maya Road booth. I am so blessed to be able to play with there stuff and have lots of fun doing it. I love working CHA with them we laugh so much, it is a lot of work but we know how to make it fun at the same time. Poor David being stuck with all those women, between you and me I think he loves it. Ok I got off track there here is the project. I did the bird house Home Tweet Home here is a list of items from Maya Road I used.
Home Tweet Home book
Windows Chipboard pieces
Mini chipboard keys
organza 1/2 rose trim-it's mistable
granny smith apple mist
elderberry blue mist
cream ruffle flowers
bethany alphas
I only used 3 pages and all the little birda and hearts and house frames are part of the book, it is a wonderful piece to work with, I sprayed the white flowers with the mist to match the papers, they are some of my new favorite colors.
Thank you for reading and I promise to post soon.
Have a great day!!!!!
Here is a project I did for CHA and the Maya Road booth. I am so blessed to be able to play with there stuff and have lots of fun doing it. I love working CHA with them we laugh so much, it is a lot of work but we know how to make it fun at the same time. Poor David being stuck with all those women, between you and me I think he loves it. Ok I got off track there here is the project. I did the bird house Home Tweet Home here is a list of items from Maya Road I used.
Home Tweet Home book
Windows Chipboard pieces
Mini chipboard keys
organza 1/2 rose trim-it's mistable
granny smith apple mist
elderberry blue mist
cream ruffle flowers
bethany alphas
I only used 3 pages and all the little birda and hearts and house frames are part of the book, it is a wonderful piece to work with, I sprayed the white flowers with the mist to match the papers, they are some of my new favorite colors.
Thank you for reading and I promise to post soon.
Have a great day!!!!!
Tuesday, December 07, 2010
Maya Road Christmas Tag
Here is a very quick gift tag I made the other day with some left over stuff from the book I made as a gift, it's a great gift tag!!!
I used the bits and pieces of paper left over from the book and covered the chipboard pieces. For this I used a mini triangle banner, a mini tag and a bird. While those are drying I cut circles to cover the inside and ouside of a super mega bottle cap, picked a flower that would match the paper chosen. Then it was just a matter of gluing it all together, I stuck a few crystal pins in the flower before gluing it down and put some to and from stickers onthe back and you have a gift tag. What tree would not be complete without a baubble on top so I just added a Maya Road resin flower. Punch a whole in the bottle cap with your cropadile and it is ready to hang.
Have a great day!!!
I used the bits and pieces of paper left over from the book and covered the chipboard pieces. For this I used a mini triangle banner, a mini tag and a bird. While those are drying I cut circles to cover the inside and ouside of a super mega bottle cap, picked a flower that would match the paper chosen. Then it was just a matter of gluing it all together, I stuck a few crystal pins in the flower before gluing it down and put some to and from stickers onthe back and you have a gift tag. What tree would not be complete without a baubble on top so I just added a Maya Road resin flower. Punch a whole in the bottle cap with your cropadile and it is ready to hang.
Have a great day!!!
Sunday, November 21, 2010
Quick and Easy Gifts.....
Well thses are some of the pages from a quick gift I whipped together this weekend. It was so easy all you need is some supplies and you can do the same. I used Maya Road products of course. My favorite quick and easy base is the 4x4 binder album. You can make a lot with a little, their mini chipboaed pieces are great for this size and they have so many to choose from so you can do any theme. Me I chose Christmas memories. The little pieces are very easy to cover with the mist and it dries very quick. I used the acrylic tags and glued vintage pictures from my etsy site on the back of them for another embelly. Quick simple and a wonderful gift.
Sunday, November 14, 2010
KATIE WATSON!!!!!!!!
If you ever get a chance to take one of her classes I would suggest you run to sign up for it. There are pictures at the end of this post of a class of hers I took at the Artistic Journey in Texas back in October and there are so many tips and tricks even an '"Old Dog" like me can learn. Actually I always tell my students no matter how long you have been scrapping you can always learn something new. I love the way Katie mixes paper from different lines, and uses vintage items, and she is very patient with newbies in her classes. She has a style that is all her own and that I love. She will show you how to get things done quick and easy. So like I said...RUN don't walk.
Tis charming little book is a gift I am giving away so someone else will have a Katie Watson original.
Monday, November 01, 2010
This one is for DAVID!!!!!!!
Glitter, glitter and more glitter.....I have been asked many times how to do this technique and it is one that I learned a many years ago. So I figured I would post a little tutorial on how to do it today.
It is the lace effect with glitter. First you want to gather your supplies.
You will need what you want to cover, a piece of lace large enough to cover the item that has a good medium pattern to it, 3-4 colors of glitter you will also need sheet adhesive large enough to cover the item.
I am using a chipboard tree coaster for this sample. I like to paint chipboard first if that is what I am covering.
After I have painted the chipbaord a ight color I cover it with adhesive. Then you would securely cover with lace, placing with the pattern how you like it.

After you have your lace firmly down you add one color of glitter, then shake it off, only add the color where you want it to stick. You do this for each color of glitter you are using, remembering to only use one color at a time.
It is the lace effect with glitter. First you want to gather your supplies.
You will need what you want to cover, a piece of lace large enough to cover the item that has a good medium pattern to it, 3-4 colors of glitter you will also need sheet adhesive large enough to cover the item.
I am using a chipboard tree coaster for this sample. I like to paint chipboard first if that is what I am covering.
Friday, October 29, 2010
I do love the vintage look....
Here is another class that I am doing at The Scrapbook Zone on Monday Nov. 29th.
It is a recipe book just in time to give as a gift for the Holiday Season. It is done in black and white so the colors from the vintage food labels really pop off the page.
Call the store and reserve your spot today. 248-553-0633
Wednesday, October 20, 2010
A new class....
Well I am back to teaching At The Scapbook Zone. I am very excited about it and hope you guys will all come by and sign up for some classes. I will be teaching my Vintage Page class there as well as a few others. Here is one just in time for Christmas. It is a Santa Star book, you will learn how to make a fun star book that you will love making more of these. You will also get to play with stickles, white and black glossy accents and flower soft. The class is Nov. 18th please call the store to reserve your spot now @ 248-553-0633.

Monday, September 06, 2010
Well it has been a while.......
I really need to post more often, I will try to post at least once week. Well not much has happened since May. I am still looking for a job, but I am teaching at The Scrapbook Zone so you will see me post my classes and dates soon I do have two classes so far on the books in Oct.
Timothy has signed up for the Army, he will be a medic and will leave July 13th of 2011. This make be both proud and sad at the same time. I am very happy that he has found something in life that he want to do and is excited about.
I went to CHA again and worked for Maya Road in their booth....I love doing this, I have so much fun with these girls- and David. Working with them is so inspiring. Here are some of the projects that I brought for the booth, I hope you enjoy them I enjoyed making them.
Ok for some reason it is not letting me organise my photos.
well have a good day.
Subscribe to:
Posts (Atom)